To watch our step by step video instruction on this, click here. 
Outlook Express is an e-mail application
included with Internet Explorer. When you installed Internet
Explorer, it may have taken your current e-mail settings to be
used for Outlook Express. Therefore, Outlook Express may already
be configured with your ISP e-mail configuration! If it
isn't, or if you would like to add an e-mail address to Outlook
Express, follow the procedure below. You can configure Outlook
Express to check as many e-mail addresses as you like.
- In Outlook Express, go to the Tools menu. Click on Accounts...

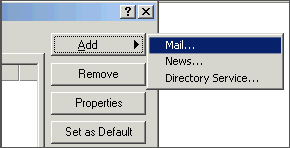
- A box will appear. Click Add and select Mail.

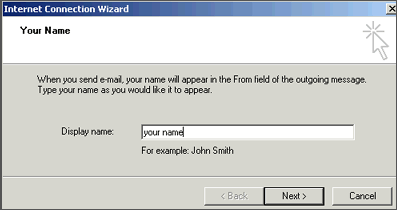
- Enter your name as you want it to appear in the "from" line for emails you send. and click Next.

- Enter your email address as you want it to appear in the "from" email address for emails you send. Typically this will be the email address you are configuring (i.e. name@yourdomain.com). Note that this e-mail address will also be the "reply to" address for this account by default. Click Next.

- Set the server type as POP3.
- Incoming mail server (POP3): Your incoming mail server is mail.yourdomain.com
Outgoing mail server (SMTP): Your outgoing mail server should be your ISP mail server* (i.e. mail.bigpond.com).
Note that you can often find out your ISP mail server by viewing the details of your ISP email account you have setup in Outlook Express. If you are not sure of your ISP mail server click
here for a list of some common ones. If you cannot recover your ISP email address and password (this was setup for you when you setup your internet connection with your ISP), click here to view the alternative setup using mail.yourdomain.com as the outgoing mail server.
- Click on Next.

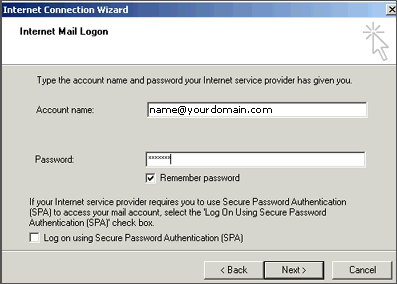
- Account Name: this needs to be the email address you are configuring - name@yourdomain.com
Password: this is the password for the email address you are configuring
Note: Do NOT check the
box "Log on using Secure Password Authentication".

- Click Next and then click Finish. After
you click Finish, you should see the following window. If
not, go to the Tools menu, and click on Accounts. After clicking Accounts the window
will appear. In this window, click on your domain until it is highlighted,
then click on Properties.

- When the next screen appears, click on the Servers tab.
Under Outgoing Mail Server, check the box next to My server requires
authentication. Click Settings....
Note: You MUST do this step so you can send mail.

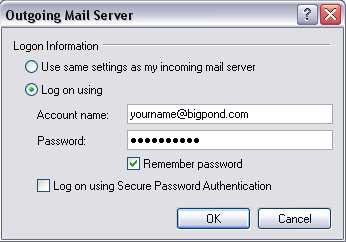
- Tick the button next to "Log on using"
Account Name:
this is your ISP email address
User Name (typically your email address with your ISP - i.e. name@bigpond.com)
Password:
this is your ISP email address password
Click on "OK"
You must do this if you want to be able
to send email!

- Click on "OK" and then "Close". Now, you're ready to send and receive mail. To set up multiple accounts,
follow these steps again.
|


